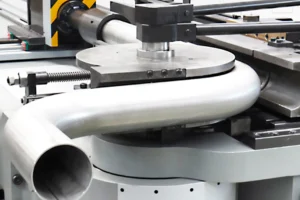
The Hydraulic Press Brake bottoming does not seem as widespread as before. However, well-informed operators have to master efficient and safe ways of performing it.
Question: At the workshop, we still face troubles related to over-bending, particularly with certain material types and parts. We have been bottoming some parts to provide a 90-degree angularity for bends. We are considering bottom bending aluminum materials. There has been a great deal of consideration on good and bad points of bottoming. What can the (dis)advantages be in connection with tools, machines, safe and productive operation?

Answer: The Hydraulic Press Brake bottoming is applicable for any kind of soft grade aluminum, like H ranges. Suppose an operator is fully aware of the bottom bending able to perform the safe operation. Herein we are delivering the best practice tips bound to provide you with assistance.
- Note the grades. As for aluminum, hard grades provide great spring-back you have to handle with. Extremely soft grades perform no spring-back.
- Avoid creases at the bending lines. Aluminum usually has a tendency of losing integrity when exposed to creasing. When making an airplane part with creases at bending lines, the effects will not be acceptable.
Note that the piercing load, i.e the strength required by the punch for piercing the materials, surpasses the formation tonnage. It seems that an operator works with large tonnage, this, in turn, causes the possibility of failure to rise because of bottoming.
It is recommended to consider the material specification in terms of the least satisfactory inner bending radii. Mostly, a ratio of 1:1 to the thickness of the material to the internal bending radius is advisable, and it may happen that, acute radii can void the material guarantee. - Watch out punching tips that are extremely narrow. The punching tips and material thicknesses should be the same or at least similar. Refrain from the coinage occurring as soon as the punching noses penetrate the neutral axle- the penetration is less deep in comparison with the thickness of materials.
- Be careful about spreading and cracks. Bottom bending, in particular when the bending is acute, turns the aluminum grains even more sensitive to cracks and spreading. If you keep the 1:1 ratio to the internal bending radii, the same or similar dimensions of material thicknesses and punching tip radii, the crack possibility over the outer face of the bend will get more and more restricted. However, the granule course has to be considered. In addition, if the parts have a “granular surface”, they should be grained in the opposite granular directions.
- The creases cannot be used for the compensation of the spring-back. Since bends should not be creased at the centers, as in case of a coin or acute bending radii, the creases cannot be used to compensate the spring-back unlike the matter with milder steels. The most actual means to perform aluminum bottom bending is applying punches of 88 degrees. Punches of 85 degrees take bends farther meaning that you will fail to gain a satisfactory spring-back (spring forward) to bring the bends back to angularities of 90 degrees.
We can come to the conclusion that only the skillful and well-informed operators can realize bottom bending at the point when spring-back surpasses two degrees. Still, there exist some means of exceeding those two degrees through punches of 88 degrees. Bottom bending is suitable for lightweight material and 90-degree bending. - Clearance of angularity should be considered. In the case of using a die of 90 degrees and a punch of 88 degrees, there will be a two-degree clearance of angularity. In the bottom bending the punching angularity and material spring-back should be matched.
To cope with a bending that has a spring-back value that differs from the gap of angles, for example just one degree for two, cheating seems a way out. Gain a reel of vinyl pinstriped tape as wide as 1/8 inch, as cheap as possible. Put some of it upon the punching face. The effects are going to be the same as those of the changed punching angles.
This type of mask tapes will work for some time, yet will need regular replacing. Vinyl pinstriped tapes will hardly ever need replacing.
However, tapes cannot be used on 2 sides of punches. Most commonly it is not applicable. The whole punching face should not be covered with tapes, as it will cause the tooling center to get changed instead of the punching angles. - The selection of your die breadth should be the same as for the ideal bending, when the die breadth is selected from 1:1 ratio of the inner bending radii and material thicknesses. Note the formula of the “ ideal” diet breadth: (2 × Material thickness) × 3.429435. In the case of 1:1 punching radii apply the same formula.
If the radius is 120 % more compared to the thickness of materials, bottom bending is unsuitable. However, while making bending of large radii in urethane, the effect will be the same as when bottoming. - Set the press brake properly. Be certain about the cleanness of every component before you install the tools. Most importantly, insert the punch right in the core of the die, no matter how long and what it will take you to do it. Note the bending lines when eliminating the tool gaps. When starting the loading tonnage should be the least, the punch should make slight touches, get the press brake started. Make sure that the tooling is fixed properly. The tooling should be aligned on both sides to provide suitable performance.
Back out or remove each supportive set screw to avoid centering the tool through warped or crooked bolsters. Any tool of new standards has nothing to do with centering, as they are fixed in their position. - While bottom bending, make the necessary bending calculation based on the punching noses and take the bending angles into consideration, including bending allowances and deductions. Note that the radii expand a little after pressure release.
The angle value, required prior to the release from the load, should be divided by the finished bending value. For instance, 92/90. The result is 1.0222, which must be multiplied by the radii of punching noses to gain the radii for bending deductions. - Upgraded tools of press brakes are suitable for bottom bending if combined correctly.
While bottom bending properly, the pressure can be 5 times as much as that of the air formation. The latest press brake tools are around seventy Rockwell. Overloading will bring about an explosion.
Note the center-line loading limits of press brakes as well. In case the limits are exceeded, rams will get out of order, the bed can be constantly cranked and fail to deviate in accordance with its intention. Watch out the sinking load and the risks of limitation exceed.
Bottom bending becomes real at a point nearly 20 % more than the thickness of your material gauged at the V-die base.
For example, 20% of the material of 0.062-inch thickness is 0.012 inches. This value is added to the 0.062-inch thickness, the result is 0.074 inch, at which the bottom bending comes on in V-shaped dies inside 18-inch or less bending lines.
From the outer radii, it must not be seen any marks or impacts of hard strokes. The same way as the internal radii must show no sign of the punching noise penetration.
In the case of American, conventional tools the application principles are the same on the whole. Tooling of this type is face hardened just on punching noses. In case of overloading, an explosion may occur.
In addition, the tooling should be stored in kits, and directed to the same way. For cutting punch sectional lengths, it is possible to use each section separately or in combination with each other. If they aren`t joined again at the initial cuts or with the tools directed in the same way, they might fail to combine with each section cut off the tool entire lengths. This is the case for dies as well. The tool precision has a great impact on the eventual combination outcomes.
Bottom Bending: A Viable Version
The correct operation will cause productivity to rise. Bottom bending leads to the stabilization of bending angularity, less variation in dimensions, few failures and consequently, less reformation.
Bottom bending seems a viable version, however, it requires careful calculation. Bottoming improves productivity and the quality, yet only skillful operators can perform it accurately, as just a single fault might cause serious damage to your press brake.
Ram disorder can occur no matter what technique is adopted by you. Bottom bending implies five times more ram-related disorders due to the high loads. Any accident might occur. The part formation may occur at an improper time through improper tools. Operators might take 2 pieces mistakenly and carry out forming meanwhile. They might stroke parts a bit harder when they are adjusting. No matter what the error is, its effects are even worse when bottom bending.
It should be noted that bottoming is not the fundamental technique of formation any more when talking things over with machine producers. They are inclined to take the industry far from bottom bending due to the above-mentioned reasons. The matter is that not many are aware of safe bottoming with no coinage on parts. Nevertheless, bottoming is possible to perform with safety and efficiency.
Learn more about our products, please visit and subscribe to our Youtube channel

